
Debbie had originally come to me with some knee and hip problems that she had been experiencing while hiking. Her knee and hips were now feeling fine, she told me, but she had a new problem. A fall off her bicycle resulted in a diagnosis of “shoulder encapsulitis,” and now, after six months of rest, massages, and two bouts of month-long physical therapy (PT) regimens, her range of motion (ROM) had improved only slightly. She was frustrated and wondered if there was anything I could do for her. After fifteen minutes, her ROM increased dramatically – she was both shocked and thrilled. Over the next few weeks, she regained the rest of her ROM. What helped her shoulder “thaw” was a perspective on frozen shoulders that I’m going to share here.
It seems that every few months, someone walks into my office with “frozen shoulder.” Sometimes it’s a self-diagnosed case (i.e., “I can’t move my arm past here”), and sometimes it’s been diagnosed as “true” encapsulitis by a medical professional. Regardless of whether the client has bothered to get a medical professional to give the shoulder dysfunction a rather grave-sounding name, the two-stage approach I present here has generally proven quite effective for the majority of clients who report having some version of “frozen shoulder.”
Stage 1 – Focus on the Symptomatic Site
The first stage involves straightforward manipulation on the areas directly related to the shoulder. The majority of Rolfers are already familiar with this approach, so a quick summary will be presented here (for a more in-depth exploration, Erik Dalton’s “Fix Painful Shoulders” blog post1 is a good start). Depending on the individual’s specific ROM limitations, you address the fascia of the relevant musculature. For example, a shoulder with limited internal and external rotation will benefit from work on the rotators. Rotational capacity can be enhanced with assisted movements with targeted work on the antagonists (e.g., gently bringing the shoulder into external rotation and attempting to relax the internal rotators). Frozen shoulder sufferers often have limited ROM in pretty much all planes of motion, so it’s common that you’ll find that you are working the entire rotator cuff and the other muscles that have not been given the privilege of entry into that much maligned group of four. Work on the pectorals, on the trapezius, along the lateral border of the scapula where the serratus anterior can lock the scapula to the ribs, and into the axillary region can all be useful.
I’ve found that working around the shoulder in this way can often yield significant ROM improvement (a few clients of mine and others have reported 80% improvement from manipulation alone). However, there appears to be a limit to how much ROM improves at this stage; and there are times when this stage of intervention provides almost no benefit whatsoever. Based on my observation of postings to the Rolf Forum LISTSERV; emails from other Rolfers; and massage, PT, and medical literature, this is a common barrier to success. I have seen many solutions to busting through this limit offered from Rolfers and across various fields. Some are not particularly palatable (unless you consider hanging mercilessly from the affected arm until the soft tissues simply “give in” and allow for better ROM to be an option). Some require a significant investment in technological gizmos that do not approach an efficacy rate that satisfies me. So these are not things I generally do. Since Debbie had already been through PT and had described receiving numerous manipulations all around the shoulder from her physical and massage therapists, I decided that doing more of the same was unlikely to produce any different result.
Stage 2 – Address the Rest
Germane to this stage is the old quote: “Where you think it is – it ain’t.” Just because a shoulder is frozen does not mean the shoulder is the problem. The name “frozen shoulder” traps us mentally into thinking the problem is the shoulder. The lack of motion there is certainly a quality-of-life problem, but the source of that problem need not be found right where the symptom lies.
At this stage, having already exhausted your manipulation options around the shoulder itself, you must look beyond the shoulder restrictions and assess the rest of the client to tease out the source of the client’s issue. Remember, you’ve already spent time manipulating the fascia and affecting the musculature directly related to the shoulder, so you can basically rule this out as “the cause” of the problem. Almost invariably, I have found that frozen shoulders most improve by paying attention to the rest of the body: specifically, what’s happening around the spine (and, by extension, the pelvis).
The following are two quick tests you can perform to begin the investigation process. If these tests are positive, you have a couple intervention options to explore.
Test 1: Static Paraspinal Prominence
Stand behind your client, as she stands however she normally stands. Palpate the paraspinal musculature. It’s very likely that you’ll find one side of the paraspinals is clearly more prominent. Typically, the paraspinals on the ipsilateral side of the frozen shoulder will be much more prominent in the lumbar and low thoracic spine, though I have seen the prominence make it all the way up to the medial border of the scapula. If you find this clear difference in the stiffness and prominence of the two sides, your interest should now be in the coordination of the kinetic chain as your client abducts at the shoulder.
Test 2: Standing Arm Abduction
Your client can do this with or without a shirt on, but it is helpful to see it without the shirt. Stand behind the client as she stands with feet parallel to each other a fist’s width apart. Have her raise her hands and arms out to the side, instructing her to tell you when she feels pain or discomfort in the shoulder. As she raises her arms, pay close attention to the orientation of the rib cage and shoulder girdle and to the prominence of the paraspinal musculature at lumbar and thoracic levels. What you will typically see is that even before the client reaches the painful part of the motion, the paraspinals on the ipsilateral side of the frozen shoulder will be much more prominent, indicating that they are far more active than the muscles on the contralateral side. This activity pulls the rib cage and shoulder girdle into rotation and makes it impossible for the humerus to articulate properly within the glenoid cavity.
You can replicate this experience for yourself by doing the test on your own with a little exaggeration. Follow the same instructions as above and see what your natural range of motion is. Now, drop your arms to your sides and twist your torso 20 degrees to the right so that your sternum is facing a bit off to the side but keep your face and shoulders squared up facing forward. Now abduct at the shoulders again and see what happens to the ROM. Unless you have some very flexible shoulder joints or are a particularly good compensator, you’ll find that your right shoulder lost many degrees of motion as a result of that twist. Try turning to the left and repeating the experiment to see what happens.
The importance of what you just learned cannot be overstated. A twist in the torso will affect the function of the shoulder joints.
Once you have confirmed that the paraspinal musculature is functioning asymmetrically, your next step is to find a way to restore symmetrical function that does not compromise the shoulder. This can sometimes be easy, and it can sometimes take a few months. However, for the sake of your client, you want to be able to see if there is a “quick fix” that not only relieves some of the shoulder symptoms but also clearly demonstrates the interrelatedness of the paraspinals and shoulder function.
Debbie’s left shoulder was the frozen one. Her torso was visibly rotated. Her whole upper body was twisting to the left (right shoulder and chest more forward than the left). The paraspinal muscles of her mid and lower back on the left side (ipsilateral side to the frozen shoulder) were much more prominent than those on the right, indicating a big, big muscular imbalance.
Intervention
“A-Position” Paraspinal Work
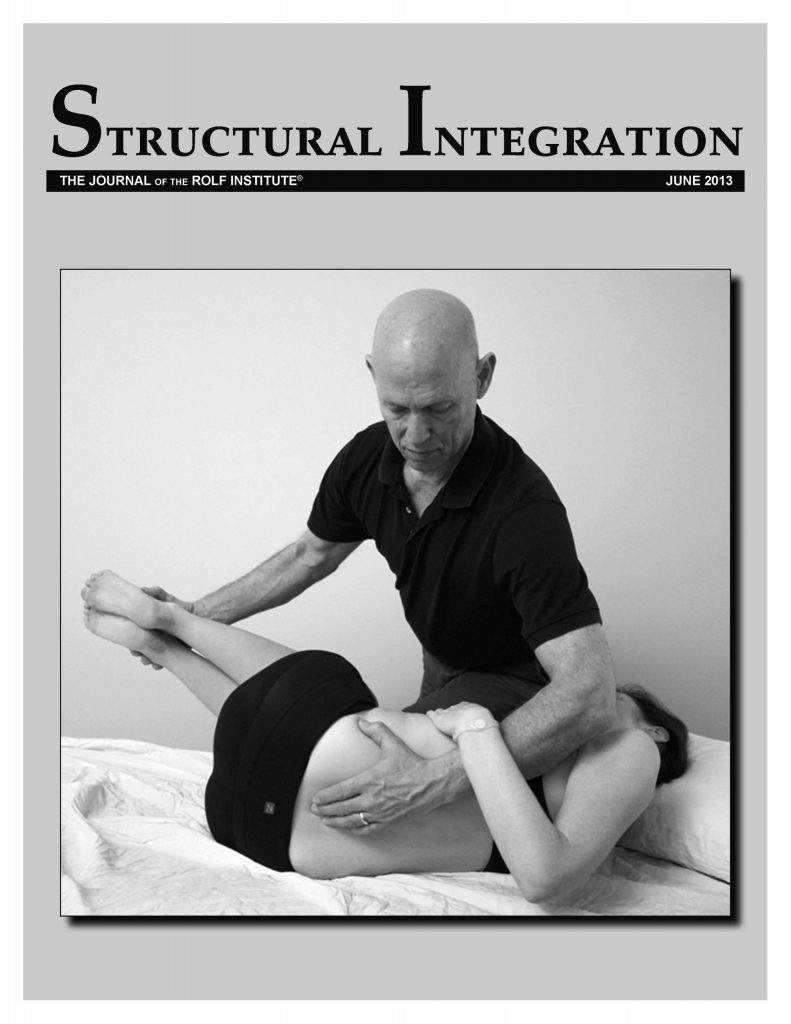
At this stage, putting someone into the “A-position” and performing some asymmetrical work on the paraspinals to encourage a release of the holding pattern will be useful. Position the client in a way that forces the spine to rotate in the direction opposite her usual pattern. If your client has a frozen right shoulder and paraspinals that are tight and prominent on the right side, you would have the client lie down on the left hip with the hip and knee flexed to 90 degrees and the chest and arms down on the table. This puts the spine into left rotation, counter to the usual pattern. (This positioning for a frozen right shoulder with prominent right paraspinals is what is shown in Figure 1.) You now work slowly and methodically on the prominent paraspinals, getting assistance from your client’s body position. The twist you have put your client in encourages the stretching and relaxation of the paraspinal muscles you’re working on.
After as little as thirty seconds and as long as five minutes, have the client stand up again and reassess ROM in her shoulder. If she notices improvement, you have now made a solid connection in her mind (and yours) that the twisting in the spine is limiting the shoulder. If there is no improvement or you reach a plateau of improvement from manipulating the paraspinals in this position and in other positions (as you deem appropriate for your client), then it would be a good idea proceed to a different mode of intervention to see if the paraspinal disparity can be eased with positions/exercises that gently demand symmetry. Below you’ll find two that I often use to restore some symmetry.
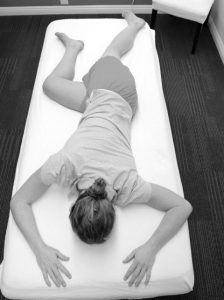
Figure 1: The “A-position” is a modified sidelying position that puts a twist in the spine. It can become uncomfortable in the neck after a few minutes, so it’s best not to have a client in this position too long.
With Debbie, the A-position manipulation produced an immediate improvement in her shoulder ROM. After another few minutes of prone back work, I had her stand up, and she had still some more improvement, but not a significant amount. Her paraspinals did not feel like they were going to suddenly go back to symmetry, so I proceeded to the exercise phase.
Air-Bench
The “air-bench” is an exercise that athletes from various sports have experienced and many Asian Americans know as a punishment parents hand down for getting a B on a test (not mine, thankfully). It is also known as the “wall sit” or the “phantom chair.” It’s typically cursed as a horrific killer of the quadriceps group, but for our purposes, it will be a useful way to try to remove the rotational pattern in the spine and restore motion to the shoulder.
Have your client stand with her back against the wall. Have her keep her butt against the wall as she slowly walks her feet away from the wall. She will be sliding down the wall until her hips are bent to about 100 degrees and her knees are bent to about 100 degrees; her knees should be directly over the ankles or a little bit behind them (see Figure 2). Instruct her to keep her lower back pressed into the wall and the majority of her weight on her heels. Have her hold this position for one to two minutes. If that’s not possible, go in small increments up to a minute. This position makes it very difficult for the spine to maintain rotations and gives the back and body a quick taste of what it’s like not to be rotated (or to at least try not to be rotated).
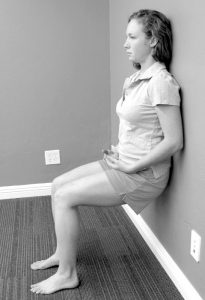
Figure 2: The air-bench exercise.
Once she has completed the allotted time, have her stand straight and then repeat standing arm abduction. Very often, you’ll find that she will be able to be abduct higher than before. Should the air-bench fail to provide any noticeable improvement, you can try the next exercise to see if you can get any ROM improvement.
For Debbie, this exercise produced more dramatic results. The shoulder wasn’t perfect, but the underlying back issue was clearly being addressed.
Upper Spinal Floor Twist
For the “upper spinal floor twist” (see Figure 3), have your client lie so that the side with the more prominent paraspinal muscles is down on the floor. Have her bend hips and knees to 90 degrees, and position her arms straight out from the chest with palms together; her head can relax on the floor (A in Figure 3). Keeping the knees together, have her bring the top hand up toward the ceiling, then all the way over toward the floor (B in Figure 3). Do not allow the knees to slide apart through the entire ROM. If her knees do slide apart, have her reduce how far she’s reaching so that the knees can stay together. Instruct your client to breathe into the lower back and into the ribs. The muscles and fascia of the lower back will gradually allow her to rotate fully through this exercise. Have her hold this position for sixty to ninety seconds then switch sides. Once the other side has been done, switch back to the first side and do that one more time. Then have her stand up and repeat the standing abduction test.
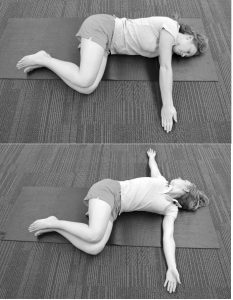
Figure 3: The upper spinal floor twist, with A showing the starting position and B the ending position.
If there is still no improvement, there is a host of other exercises and positions to attempt, but presenting them all is beyond the scope of this article and, without further training, is likely beyond the scope of many Rolfers’ practices.
Discussion
If there is marked improvement from the paraspinal work you’ve done in the A-position and/or from either or both of the exercises, you have very strong evidence that more work to restore symmetry of function to the paraspinals will help unlock the shoulder, and that should become your focus. Your efforts can focus on restoring balance to the paraspinals, as well as to the hip stabilizers that may be holding the pelvis in a rotation that forces the paraspinals to begin a counter-rotation. If you find that manipulation over the course of a few sessions does not continue to provide any benefit, referring the client to someone with expertise in restoring muscle balance with proper, targeted exercise is advisable.
For Debbie, addressing the paraspinal asymmetry helped unfreeze her shoulder noticeably. She was able to move her shoulder much better, and careful progression into exercises that challenged her shoulder mobility (without allowing for paraspinal compensation) over the next few weeks got her to the point where she could do the yogic “reverse namaste” position without discomfort again.
A Final Story
When Lorna walked in, she was unable to lift her left arm out to the side beyond about 30 to 35 degrees from her body. She physically couldn’t do it because of the pain. She also couldn’t lift her arm out in front of her beyond about 40-50 degrees without more pain in the shoulder joint. An MRI by a doctor showed an old rotator cuff injury – which he deemed too old to repair – as well as signs of bone spurs within the shoulder joint. The doctor told her that if physical therapy didn’t help, she should consider surgery to clear out the bone spurs. After four weeks of rotator cuff strengthening exercises and some painful attempts to restore ROM, she was no better off than when she had started. The surgeon’s blade drew ever nearer. In her fifties and still wanting to be able to work on upholstery projects and do volunteer work with horses, she did not consider this great news.
She came to see me on the recommendation of a friend of hers who had finally gotten relief from her back and leg pain after enduring two failed surgical attempts. Lorna was skeptical that anything could be done given the medical diagnosis, but was willing to see if something could help.
By addressing the paraspinal asymmetries and retraining her body to coordinate different regions, it took about forty-five minutes for her to be able to move her arm through almost the full ROM. It took another month for her to fully regain motion and control.
Remember: “Where you think it is – it ain’t.”
Endnotes
Matt Hsu is a Rolfer, Egoscue Certified Posture Alignment Specialist, and NASM Corrective Exercise Specialist in San Diego, CA. He is the tech geek behind websites4rolfers.com and is a co-teacher for Seeing Made Easy, a class focused